Spend Less Time Searching and More Time Teaching

A man sits at a desk, focused on a desktop computer in a bright office with large windows behind him.

Find the course strategies and practical guidance you need on our upgraded Resources page

Preparing for the start of a semester? Forming plans for a new course? The Online Teaching website is here to help. 

What began as a pandemic resource for faculty scrambling to teach in virtual classrooms has developed into a comprehensive collection of best practices, innovative approaches, and research-based guidance for online teaching excellence.

Online Teaching, the Center for Academic Innovation’s online teaching and learning website, has continued to evolve as a resource for instructors and course designers seeking information and inspiration. In 2025, we started publishing a new article or video every Friday, expanding our coverage on generative AI and technology tools, education policy analysis, and the latest online education trends, while still delivering useful instructional tips and research-based insights. 

Last October, we launched the Online Teaching newsletter, which delivers the latest content, expert profiles, relevant news, research, and events directly to your inbox every month.

Now the Online Teaching site features a reorganized and expanded Resources page. Here you can find tips on using asynchronous tools effectively or building better discussion boards. Perhaps you want to optimize some of the University of Michigan’s GenAI tools for student support, or learn about new pedagogical approaches from your U-M peers. With the new Resources page, we’re able to provide years of guidance in one place.

The page is organized into the subject areas that instructors want. Articles, videos, and guides representing the best of the Online Teaching content catalog are linked under the following collections:

  • Accessible & Inclusive Teaching — Find resources on meeting digital accessibility requirements and removing barriers for all learners.
  • Artificial Intelligence — Explore practical and effective ways to use AI for student support or course planning while promoting academic integrity. 
  • Assessments — Learn how to craft better activities and exams that not only measure learner knowledge, but also guide and encourage their learning progress.
  • Media & Recording — Get expert advice on setting up a home studio or writing and recording a virtual lesson.
  • Teaching Tips — Delve into recommendations for more effective instruction, from team-building to discussion boards to finding open educational resources.
  • Instructor Voices — Articles and videos from your U-M peers on how they’re weaving innovation into their courses.  

So skip the search bar and dive straight into these curated Resources from Online Teaching to find proven methods and expert guidance that help you meet your teaching and learning goals.

How this helps

Synthesize volumes of information with a custom tool
Create course materials based on your own sources
Log in with your “umich.edu” account to access U-M privacy protections

Planning course assignments and materials often starts with volumes of documents and data. If you find yourself facing a sea of content and need a tool to navigate it, Google’s Gemini Notebook might be the solution. 

Gemini Notebook (formerly known as NotebookLM) is designed to serve as a personalized research and thinking assistant, but one in which you control the sources. While it’s powered by Gemini, Google’s generative AI chatbot, Gemini Notebook only works off the sources you direct it to, so the potential for hallucinations is much lower than any web-facing tool. Your data also remains private and secure as part of the University of Michigan’s Google at U-M bundle, which provides core Google tools to all faculty, staff, and students. 

This AI-powered tool is similar to U-M Maizey in that it runs on the sources you provide. Once uploaded, Gemini Notebook can interact with your sources — developing summaries, asking questions, building learning materials — giving you a custom GenAI experience.

The U-M Maizey tool offers better pedagogical control, allows for Canvas integration, and is fully accessible, so for some projects it may be the better option. Comparatively, Gemini Notebook has additional Studio Features, including custom podcasts, and can work with a broader variety of sources.

U-M MaizeyGemini Notebook
Pedagogical control: Offers features like custom system prompting, creating multiple AI experiences via “apps” and other parameters.Limited customization: Not as many settings to control the project.
Canvas integration: Integrates seamlessly with the Canvas learning management system.Podcast feature: Offers a unique podcast capability for auditory learning.
Accessibility: Fully accessible.Accessibility: Not fully accessible.
Sharing capabilities: Maizey projects can be shared with others.Sharing capabilities: Projects can be shared with specific people or MCommunity groups.
Ownership: Maizey projects can be owned by an MCommunity group.Ownership: Ownership of projects cannot be transferred.
Sources: Websites, Google Drive folders, Dropbox, Canvas. Full list of supported file types.Sources: Websites, Google Drive documents, YouTube, “Discover sources” feature (web). Full list of supported file types.

Interact with Your Sources

One of the best features of Gemini Notebook is that it’s grounded in your sources, and it shows you which sources it cites for every output it produces. While there is a small probability the tool tries to source answers using a large language model, in this case, Gemini, the tool has a citation feature, so you can click on the citation attached to the specific passage to confirm the source. 

Currently, you can upload up to 50 different sources into Gemini Notebook, including more than two dozen document, image, and media file types. You can also easily select and deselect which sources you wish to use for any task. If there’s a source you need but don’t have on hand, Gemini Notebook can search the web, and you can review and select potential sources to include. 

Once your sources are uploaded, they will appear in the first of the three columns on the Gemini Notebook interface. The second column is the Chat feature, where you can interact with your sources using the Gemini chatbot. You can guide the Chat outputs through your prompts. Among the key capabilities are:

  • Organize and synthesize your sources.
  • Ask questions and interact with your content.
  • Generate new content from sources (more below on Studio features).
  • Enhance team collaboration.
  • Valuable for faculty and students managing large volumes of material and seeking fast, reliable insight.

Studio

The third column houses Gemini Notebook’s Studio features. This is the content-creation hub of your Notebook that uses your sources to inform an array of media and study assets. 

Audio overview: This popular feature produces a podcast, with two voices discussing your Notebook. This is a great feature for auditory learners, or if you want to review content during a commute or walk. You can even interact with the podcast “hosts” and ask questions in real time.

Video overview: These short-form videos are slideshows of your content with a voice over. You can customize the visual style and what content you wish to have covered. 

Flashcard and Quiz: Interactive tools designed for self-assessment and studying. 

Reports: You can generate a large number of reports, including briefings, study guides, blog posts, policy briefs, white papers, explanatory guides, and informational pamphlets. 

Infographic: Create a custom graphic for your course materials or presentations. Note that while these can be customized, the final product is not editable.

Slideshow: This can help inspire your presentations, though the output is a PDF, so you’re unable to edit it. A workaround for this is to ask Gemini Notebook to write an outline for a slide deck, then copy and paste it into the Gemini app and ask it to create Google Slides, which you can then export to your Drive and edit.

Mind map and Data table: Two additional ways to analyze and portray your sources. 

Once you create a Gemini Notebook, it will be saved on your dashboard under “Recent Notebooks,” and you can share it with U-M colleagues and team members.

Practical Tips

  • Log in with your U-M credentials: To access the privacy protections offered through the university, make sure to sign in with your “umich.edu” address.
  • Configure notebook: At the top of the Chat column is a menu called “Configure notebook,” which allows you to customize the conversational style or role of the output, as well as the response length. 
  • Learning Guide: Within the Configure tool, there is a Learning Guide option, which creates an interactive learning experience that guides you through your assets. 
  • Save to note: If you want to keep a Chat output, you can click “Save to note” at the bottom, and it will add it to the Studio column. This is key as Gemini Notebook does not currently have chat History. Chats can also be saved as Sources if you wish to use them to inform the project.

Resources

Upcoming Workshops

From Idea to Insight: Gemini for Education | U-M Academic Technology — ITS Instructional Support Workshop, Sept. 1, 12-1 p.m.

Exploring Gemini Notebook for Education — ITS Instructional Support Workshop, Sept. 15, 12-1 p.m.

Additional Resources

Introducing Google Gemini and NotebookLM — Starting guide to accessing, implementing, and using Google’s core generative AI tools.

GenAI Workshop Series — A series of hour-long workshops available on-demand that cover the basics of GenAI and its applications in academic and everyday settings. Those who complete the courses, which are slotted into beginner, intermediate, and advanced levels, are eligible to earn GenAI badges. 

Teaching with GenAI — A self-paced course for U-M instructors and staff seeking skills on integrating GenAI tools in their teaching practice. Those completing all eight modules receive a Teaching with GenAI badge.

Your essential guide to Google AI for college — Written for students, but a great resource for anyone using Google tools. 

50+ Ways to use Gemini in Higher Education — Designed for faculty, researchers, administrators, leaders, and students on how to best use Gemini and Gemini Notebook in higher education.

U-M Resources

Angela Marocco is an instructional learning specialist lead for University of Michigan Information and Technology Services. This article is based on her workshop, “Exploring Gemini Notebook for Education,” part of the Generative AI Workshop Series offered by ITS Teaching and Learning.

How this helps

Learn how Gemini’s tools can support instructors
Explore and develop materials safely with data privacy
Design custom Gems that add efficiency to your work

As the campus emerges from its summer slumber, instructors are preparing for the fall semester by diving into the latest research, brainstorming creative activities, and designing impactful materials. Google Gemini can do all of this — and more.

At Information and Technology Services, we are constantly exploring and identifying ways technology, including generative AI, can support our faculty and staff with their course preparation, development and design. Gemini’s capabilities can support much of that work. 

Gemini is Google’s flagship generative AI chatbot and virtual assistant. It can save time, personalize learning, and assist educators with a variety of tasks, including generating lesson plans, developing differentiated activities, and breaking down complex concepts. 

All University of Michigan faculty, staff, and students have access to Gemini through their ‘umich.edu’ accounts. That means your data remains private and secure, and interactions with Gemini are not used to train Google’s AI models. 

Gemini can be most closely compared to U-M GPT, but offers more features than its counterpart.

Gemini vs. U-M GPT

U-M GPTGemini
Key strengthsSafe, fully accessible, private environment for U-M specific tasks.Quicker with complex tasks, can understand many types of information (like videos), and often has more recent knowledge.
LimitationsFile upload size limits. Knowledge is typically older.Not fully accessible.
FeaturesSeveral foundational and reasoning models; has some U-M content.Canvas feature, deep research, connects to Drive, microphone/listen to chat, verify responses, Gems.

Gemini Tools

Gemini offers a series of tools designed to optimize its capabilities and be customized to achieve your desired outcome. The tools can be selected when clicking on the ‘+’ symbol in the Gemini prompt bar. 

Guided Learning

With Guided Learning, Gemini acts as a personalized AI tutor, taking you step-by-step through the results. The information is scaffolded and presented in an instructional way for the user, offering different topics to explore based on the initial question.

For example, we prompted Gemini with this query while selecting the Guided Learning tool: “I am an English major and I want to understand what an LLM is.” 

The response included a summary of how large language models work, how it scans huge libraries of text and learns about writing patterns. 

It then offered three lessons:

  • The digital library (training) — How an LLM reads billions of pages to learn grammar, tone, and style.
  • The map of meaning (semantics) — How models turn words into mathematical coordinates to understand relationships between concepts.
  • The predictive writer (generation) — The mechanics of how a model actually decides which word comes next when responding.

We selected the third option, and the tool provided a lesson on how LLMs actually write, with a series of additional details and sources for a deeper dive. As we continue to interact with Gemini, the learning model guides us through interactive prompts to check learning and provides feedback, always shaping the conversation around concepts that are familiar to an English major.

Create Images

This is a text-to-image tool that generates imagery or graphics — great for developing course and presentation materials, including Google Slides. 

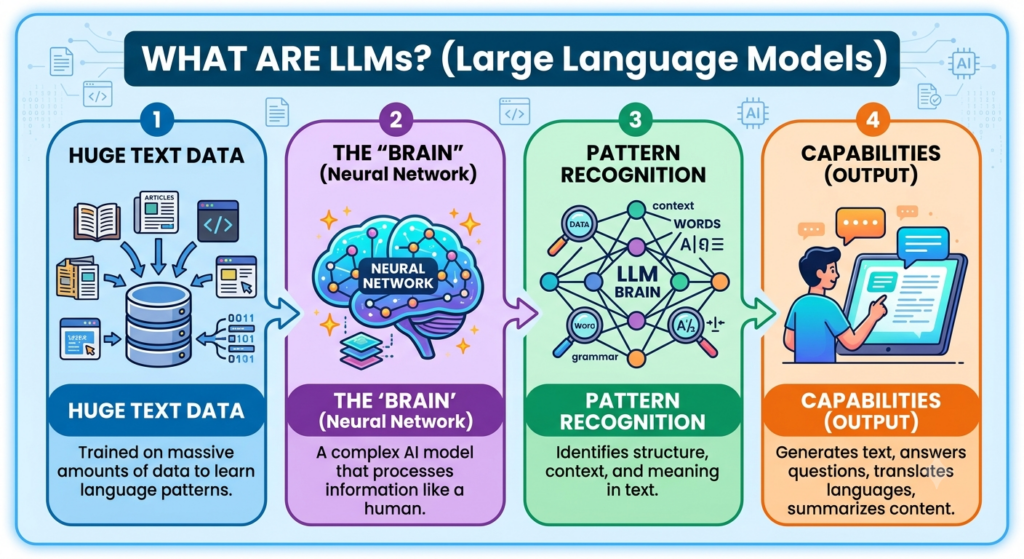
Based on the previous example, you could create a graphic that explains LLMs with this prompt: “I want to create a simple image that explains LLMs.” Here was our output:

Infographic titled "What Are LLMs? (Large Language Models)" arranged as four connected panels flowing from left to right. Step 1 shows large collections of text data feeding into a database. Step 2 illustrates a neural network as the model's "brain." Step 3 depicts the model recognizing patterns, relationships, context, grammar, and words. Step 4 shows a person interacting with a computer while the model generates text, answers questions, translates languages, and summarizes content.

Once we have an image, we can download, copy, and share the image. We can also use the Adobe integration in Gemini for basic image editing.

Canvas

Not to be confused with the learning management system, the Canvas tool in Gemini provides a split-screen workspace with the prompt results appearing in an editable working document. The Canvas document has many of the same features as a Google Doc and also includes features such as tools for adjusting tone, length, and AI-suggested edits. Other helpful tools include:

  • Built-in Gemini. Highlight any portion of the text, and a Gemini prompt box appears and you can ask it to expand or adjust the content.
  • Create new content. In the Canvas document, you can create different types of outputs, including web pages, infographics, quizzes, and flashcards. 

From the Canvas, you can share the chat conversation in Drive, export the content to Google Docs, or copy the text to use elsewhere.

Deep Research

You can potentially save hours of time locating potential research sources with the Deep Research tool. The tool generates a research plan that you can review and edit before beginning, giving you control over the process. It produces comprehensive reports from a broad variety of sources, with citations linked in the report so you can verify the information. Additional features include:

  • Curating sources. You can choose to include Google Drive documents, emails, prior Gemini chats, and general Google searches. The tool provides a list of sources used at the end of the output, as well as those considered but not included. 
  • Create materials. You can export the final research report as a Google Doc, or to your Google Classroom. You can also create flashcards, quizzes, or infographics from the research.

Gems

Gems are similar to U-M Maizey, providing an option to create a personalized, expert chat tool. These can be used for almost any aspect of your work, from lesson planning to personalized learning to research. Gems are based solely on your own sources, not internet searches. Examples can include a Gem that formats citations in Chicago Manual style or drafts alt-text for your photos.

The Gem remains in your Gemini toolbox, so whenever you need to deploy it, it’s ready for you. Plus, you can share Gems with your U-M colleagues.

Tips on creating Gems

  • Persona and audience. When writing instructions to create a new Gem, identify what the Gem is acting as, such as a faculty member or accessibility expert. After explaining what it’s going to create, be sure to identify the target audience for the Gem (students, fellow U-M staff, etc.).
  • Follow a framework. “You are _____ at a large university in the U.S., creating a _______ for _______. It must include ____, ____, and ____.” 
  • Use Gemini to edit. Click the Gemini edit tool to receive suggestions to improve the tool’s performance. 
  • Set a default tool where appropriate: Select Gemini tools like Guided Learning, image creation, Deep Research, or the Canvas depending on what you will use the Gem for.

Practical Tips

  • Log in with your U-M credentials. To access the privacy protections offered through the university, make sure to sign in with your “umich.edu” address.
  • Choose your model. Gemini offers a range of AI models designed for different tasks, such as advanced coding, deep research, or audio and video capabilities. Research the options to choose which best supports your work.
  • Access Drive files. Gemini works within the Google Workspace and connects seamlessly to your existing Docs, Sheets, and other Drive files. You’re limited to 10 sources per chat.
  • Pin past chats. The menu on the left of the home screen allows you to pin any chats you want to easily access. 
  • Connect to your Google apps. In the Settings wheel, click on Connected Apps to determine which applications Gemini can access. This helps remove the step of uploading files and references for each new chat. Once you have connected apps, simply type ‘@’ into the Gemini prompt and select which apps you wish to source.

Resources

GenAI Workshop Series — A series of hour-long workshops available on-demand that cover the basics of GenAI and its applications in academic and everyday settings. Those who complete the courses, which are slotted into beginner, intermediate, and advanced levels, are eligible to earn GenAI badges. 

Teaching with GenAI — A self-paced course for U-M instructors and staff seeking skills on integrating GenAI tools in their teaching practice. Those completing all eight modules receive a Teaching with GenAI badge.

Your essential guide to Google AI for college — Written for students, but a great resource for anyone using Google tools. 

Additional ITS and U-M resources:

Angela Marocco is an instructional learning specialist lead for University of Michigan Information and Technology Services. This article is based on her workshop, “From Idea to Insight: Gemini for Education,” part of the Generative AI Workshop Series offered by ITS Teaching and Learning.

How this will help

Identify asynchronous tools available for online instruction
Give learners time for reflection and flexibility
Use AI to structure discussion and prompt engagement

Learning does not only happen when everyone is in the same place at the same time. Asynchronous tools allow students and instructors to communicate, collaborate, and engage with course materials without being online simultaneously. Used thoughtfully, these tools can make a course more flexible, accessible, and reflective. If live sessions are a way to get a quick pulse on a classroom, asynchronous tools can allow for deeper learning, community building, and application of knowledge.

Asynchronous communication tools can solve problems that many struggle with, including:

  • Students who disappear between live sessions
  • Discussion that only happens in the moment and then evaporates
  • The same students dominating every conversation
  • Learners in different time zones or with rigid work/family schedules
  • Thinking that needs more than 10 seconds to develop

Types of Asynchronous Tools

Emails and Announcements

Email is the classic example of an asynchronous communication tool. Email and the Announcements tool in Canvas are great ways to reach all students simultaneously, giving instructors a broader reach.

Discussion boards and Q&A spaces

Discussion boards can sometimes have a bad reputation in online learning. If used to promote reflection, synthesis, and application of core course concepts, discussion boards can be very effective. They can be used as a presentation space, a gallery and reflection space, or a group workspace. Discussions can include audio or video. For more information about making discussion boards work, see our article on facilitating online discussions

Annotation tools

Annotation tools support learners working together on a single document. Learners can highlight and remark on the content and, much like a threaded discussion, comment on others’ comments. Examples of annotation tools include: Perusall, hypothes.is, and the comment features in Google Drive tools.

Collaborative documents/shared spaces

Tools like Google Docs and Slides, Miro, and wikis give students the opportunity to create shared knowledge products together. Students can build documents, presentations, and process course materials and instruction together.

Benefits of Using Asynchronous Tools

There are many perceived benefits of same-time collaboration, such as interpersonal skill development and time management. While live sessions have their place, asynchronous tools offer some distinct advantages that synchronous interaction simply can’t replicate.

  • More visible insight into students’ thought processes. Many tools track changes or use version control. You will be able to see how students edit and change their thinking throughout the development of an assignment.
  • Time for reflection. Live sessions force students to respond in the moment. Asynchronous tools give students the time and space to think, reflect, and formulate their thoughts.
  • Flexibility to engage with all students. Think about who participates the most in your live sessions versus those who might be more hesitant. Asynchronous tools give an additional modality for participation. Some students may be better at writing and reflecting.

Challenges with Using Asynchronous Tools

  • Asynchronous tools frequently take more time. Writing and reflection take longer than speaking in a face-to-face setting. Having more students participate is more time-consuming. It is important when using asynchronous tools that you understand the time involved for both you and the learners.
  • “It will run itself.” Tools for interaction (like discussion boards) work best with active instructor involvement. The “post once, reply twice” each week can lead to student disengagement if there isn’t a community. Research shows that discussion boards can be very effective if the instructor participates in some way. Read more about managing a quality discussion board here
  • Tool overload. Having every tool available can be overwhelming, for both the instructor and the learners. Be thoughtful about what tools you will use and what purpose they serve. This will help guide students to know where to look for what information.

GenAI in Asynchronous Tools

Generative AI tools, like ChatGPT and Copilot, are themselves asynchronous tools available on demand, at any hour, without waiting for an instructor or peer to respond. That does not mean that asynchronous tools are obsolete. It does mean it is important to deliberately craft activities that get the best response from students.

  • GenAI shifts how to structure peer discussion. If a student can get an instant answer from AI, the reason to post on a discussion board shouldn’t be to report out information. Instead, use discussions to think out loud, debate, and apply ideas. Design questions and prompts accordingly.
  • Asynchronous tasks that are designed around content recall can be completed by GenAI. Design tasks that ask students to apply that content to their own experiences and context.
  • Use version control and track changes to see how students’ thinking and ideas evolve. Break up assignments so that students submit multiple versions of the document.

Practical Tips

  • Some tools, like a discussion board, can easily become overwhelming with information if you try to read every single message. Consider what your strategy will be for managing the facilitation of tools. See our article on time management in course facilitation for more.
  • Create clear boundaries around tools. For example, you may specify that all academic discussions or questions should take place in a discussion board. For personal communications or questions about grades, use email. Limit the number of communication tools utilized to minimize confusion.
  • Model communication behavior and norms for students. Students will use your contributions as an example for participation. They want to hear your voice on the topic. Don’t just give a prompt, but also consider kicking off discussion postings with your own reflection on the topic.

Research

Harman, K. & Koohang, A. (2005). Discussion board: A learning object. Interdisciplinary Journal of E-Learning and Learning Objects, 1(1), 67-77. Informing Science Institute. Retrieved December 9, 2019.

Osborne, D. M., Byrne, J. H., Massey, D. L., & Johnston, A. N. B. (2018). Use of online asynchronous discussion boards to engage students, enhance critical thinking, and foster staff-student/student-student collaboration: A mixed method study. Nurse Education Today, 70, 40–46.

University of Miami. (2019). Asynchronous communication tools.

Nick Gaspar is director of online and digital education at the University of Michigan-Flint. Tazin Daniels is an associate director at the Center for Research on Learning and Teaching.

If you spend any time talking with online instructors right now, you’ll hear a version of the same question:

How do I prevent students in my online course from cheating with generative AI?

It’s an understandable concern. These tools are fast, easy to access, and often produce work that looks polished on the surface. In an online course, where you don’t see the process unfold, that uncertainty can feel amplified. You’re left wondering who actually did the thinking behind what was submitted.

That anxiety is real, and it comes from instructors who care about their students and the integrity of their courses. When we focus on stopping AI, we center the tool and shift our energy toward control. A more useful question brings the focus back to the learning environment:

What conditions are we creating that make cheating in this online class feel like a reasonable option?

This doesn’t excuse misconduct. It does push us to examine course design, workload, clarity, connection, and stakes. If a student believes no one will notice their effort, the assignment feels disconnected, or the fastest path to survival is outsourcing the work, generative AI becomes a convenient solution.

Proposal

A durable response to generative AI starts with understanding why students cheat in the first place.

Cheating often functions as a signal. It can point to pressure, confusion, disengagement, or a lack of perceived relevance. Students enter our courses with different constraints and motivations. A student balancing work and caregiving may use AI to keep up. A student who feels lost may use it to fill in gaps. Another may see it as a shortcut when the task feels transactional.

These differences matter.

This is why the conversation needs to center on instructional and relational design.

Instructional design shapes how learning unfolds. Are expectations clear? Do assignments build over time? Are there opportunities for feedback before high-stakes work? Relational design shapes whether students feel visible. Do they believe their effort matters? Do they feel connected to the course and the people in it?

When clarity and connection are present, students are more likely to invest in their own work. The focus shifts toward building conditions that support integrity.

Motivation and Design Responses

Disconnection

Many online learners experience courses as a series of isolated tasks. They log in, submit work, and move on. Over time, the course can feel transactional, and in that environment, integrity becomes abstract. If no one feels present in the process, using AI can feel no different than using any other tool.

Design Tip 1: Build connection early and intentionally

You can shift away from this dynamic without overhauling your course. A few purposeful design choices go a long way. 

  • Use structured introductions that connect to the course. Not a generic ‘post your bio’ prompt, but something that invites students to share their experiences, perspectives, or questions tied to the course topic itself.
  • Be visibly present in small, consistent ways. This could include short weekly videos, targeted feedback, or structured check-ins with students. 
  • Design interaction that requires students to engage with each other’s thinking. Think of this in terms of responsibility to a group rather than themselves. When students engage with each other they see their work as part of a shared process.
  • Create low-stakes opportunities early so students can participate without pressure. These interactions create a foundation that can carry forward into more complex work later. 

None of these strategies eliminate misconduct on their own. They do change the experience of the course in ways that make disengagement less appealing and investment more natural.

Confusion About Boundaries

Students are often trying to figure out where the line is. Using AI to revise writing may feel similar to using spellcheck. Generating ideas or outlines can feel like part of the process, but when expectations aren’t clear, students rely on their own judgment.

Design Tip 2: Make expectations explicit and a part of your course

  • Write AI guidelines in plain, direct language that students can actually interpret. Avoid vague phrases like “use responsibly.” Instead, say something like: “You may use AI to help revise grammar and clarity, but the ideas, structure, and arguments must be your own.”
  • Go beyond listing rules. Walk through examples that show what acceptable and unacceptable use looks like in your course. For example: “Asking AI to suggest alternative wording for a paragraph you wrote is acceptable. Asking it to generate a full response to a discussion prompt and submitting it is not.” Tie these examples directly to your assignments.
  • Invite questions and normalize uncertainty so students feel comfortable asking where the line is. Build this into the course. A short discussion prompt or anonymous question form early in the term gives students space to ask, “Would this be okay?” before they’re in a high-pressure situation.
  • Address gray areas early, before students encounter them on high-stakes assignments. Spend a few minutes during the first major assignment walking through common scenarios. Show them what borderline use looks like and how to make better decisions before it counts for a grade.

Perceived Busy Work

When assignments feel disconnected from meaningful learning, students look for the fastest way to complete them. If a task feels generic or easily handled by AI, engagement can drop.

Design Tip 3: Make assignments purposeful and connected

  • Be transparent about why the work matters. Take a moment to explain what the assignment is designed to help them practice and develop. Students are more likely to engage with it if they understand the purpose. The TILT framework is a great way to approach this.
  • Develop more authentic assessments that connect to real contexts. This could include applying concepts to a current issue, a professional setting, or a scenario they might realistically encounter.
  • When students can see themselves in the work, it becomes harder to treat it as disposable. Build in choice where possible. Let students connect topics to their own field, interests, or goals.
  • Incorporate elements that require personal or local application, along with opportunities to show progress over time. Drafts, revisions, or iterative steps make the work feel more grounded in their own thinking.

It’s also worth asking a simple question as you design your course: would I want to do this assignment? If the answer is no, it’s likely that students will feel the same way.

Overload and Pressure

Many online students balance competing responsibilities. When time is limited, AI can feel like a way to stay afloat. Under pressure, AI output can reinforce perfectionism.

Design Tip 4: Build structure that supports progress over perfection

  • Scaffold assignments so students aren’t carrying the full weight of a task all at once. Chunk larger projects into smaller pieces with clear checkpoints along the way.
  • Use milestones to pace the work. This helps students stay engaged over time and reduces the temptation to complete everything at the last minute. A simple example is opening your course modules one at a time on scheduled dates.
  • Build in revision cycles. Give students opportunities to improve their work based on feedback rather than expecting a single, high-stakes submission.
  • Normalize drafting as part of the process. When students see that strong work develops over time, it shifts expectations away from immediate perfection. For example, instead of collecting a single final paper, have students submit a rough draft or outline first, receive brief feedback, and then revise before the final submission.

An Honest Look

Before we wrap up, it’s worth taking an honest look at why generative AI is so appealing to students in the first place.

It’s fast and available whenever they need it, including at 2 a.m. when a deadline is quickly closing in. It doesn’t judge or get frustrated when students need a concept explained again. It produces something that looks polished, even when the student isn’t fully confident in their own understanding. That combination is hard to compete with, especially in online environments where students are often working alone.

At the same time, there are real tradeoffs that students don’t always recognize in the moment.

Overreliance can lead to skill atrophy. Students miss opportunities to practice and develop their own thinking. Over time, they stop building the capabilities the course is designed to support. It can also create false confidence. A polished response can give students the impression that they understand the material more deeply than they actually do.

And perhaps most importantly, it removes the cognitive struggle where learning happens. Working through confusion, making mistakes, and refining ideas is part of how understanding develops. When that process gets outsourced, the learning often goes with it.

These dynamics matter for course design. You can’t design effectively around generative AI without first acknowledging why students are drawn to it.

Takeaways

This work ultimately comes down to the environment you create.

Academic integrity in online courses extends beyond policy statements. It shows up in course structure, communication, and student experience. Students respond to clarity, purpose, and connection.

You won’t eliminate the temptation to cheat for every student. What is within your control is reducing the conditions that make cheating feel necessary or reasonable.

A fully “cheat-proof” course isn’t realistic. There will always be ways for students to work around a system if that is their goal. Chasing that outcome can pull attention away from the parts of teaching that have the greatest impact.

What is within reach is a course that students want to engage in. One where expectations are clear, their presence matters, and the work feels meaningful.

Ask yourself the following:

If you were a student in your own course, would you feel invested in the work or focused on just getting through it?

Resources

Guide to Generative AI

Generative AI for Faculty

Generative AI Innovative Practices

Randomized trial found AI-mediated feedback improved students’ revisions when instructors stayed in control

Emily France is marketing and communications manager with the Computer Science and Engineering division of Michigan Engineering. This article was originally published by the University of Michigan Engineering News.

Key takeaways

AI tool FeedbackWriter suggests rubric-aligned feedback on student essays, but TAs decide what to keep, edit, or discard.
In a randomized trial with 354 students, AI-mediated feedback led to higher-quality revisions compared to human-only feedback. The effect size is comparable to moving a student from the 50th to the 70th percentile.
TAs agreed with 88% of the AI’s rubric judgments and corrected the remaining 12%, underscoring the importance of human oversight.

Artificial intelligence can help instructors write better feedback on student essays and improve learning outcomes when AI is used as a behind-the-scenes assistant rather than a replacement for human graders, a new University of Michigan Engineering study suggests.

The researchers developed an AI-mediated system called FeedbackWriter, which offers university teaching assistants (TAs) suggestions aligned with assignment expectations while they read student essays, giving TAs the final say on what to use, edit or discard.

“Feedback is one of the most powerful mechanisms for learning, but it takes time and effort to provide personalized feedback to each student,” said Xu Wang, an assistant professor of computer science and engineering at U-M and corresponding author of the study presented today at the Association for Computing Machinery’s Conference on Human Factors in Computing Systems (ACM CHI). 

“Our goal was to understand whether AI could help people provide high-quality feedback at scale while keeping humans in control,” she said.

The work was supported by the National Science Foundation and conducted in collaboration with Mitchell Dudley, a teaching professor of economics, and Larissa Sano, a lecturer and science writing specialist in the U-M Sweetland Center for Writing.

“This project shows how AI can support instructors by giving rubric-relevant suggestions that they can use to generate high-quality feedback for each student,” said Dudley. “This not only improves instructor workflow, but also the quality of the feedback given. This is especially valuable in large-enrollment courses, where writing-to-learn is powerful but quality feedback is hard to scale.”

AI That Understands How Graders Think

Prior research has explored AI-generated feedback delivered directly to students, but studies have found AI to be unreliable, particularly on assignments that require knowledge of the field and conceptual accuracy. In interviews, experienced TAs described their workflow as going beyond simply spotting errors; they must connect comments to a grading rubric, find evidence in students’ essays and craft feedback that is actionable without giving away the answer.

To support that work, the research team first engaged in a deliberate process to extract a knowledge checklist, or rubric, that defines what good and bad solutions look like. FeedbackWriter then uses this rubric to guide the AI through a structured pipeline: It identifies passages relevant to each rubric item, decides whether the rubric item has been met and drafts suggested feedback. 

The interface is designed to keep the human grader in charge. TAs can accept or reject AI judgments, edit the suggested feedback or write their own from scratch. 

“We’re not trying to replace human instructors,” said Xinyi Lu, a PhD student in computer science and engineering and first author of the study. “We’re trying to build a collaboration, where AI helps with the parts that are difficult to do consistently at scale, and the TA provides final decision-making.”

Tested in a Real University Course

The researchers evaluated FeedbackWriter in a randomized controlled study in an introductory economics course with 354 students and 11 TAs, using two knowledge-intensive essay assignments. Students wrote a first draft, received either AI-mediated feedback through FeedbackWriter or human-only feedback, then revised and submitted a final draft. In a second assignment, the groups switched, so students received both types of feedback across the two assignments.

When students received AI-mediated feedback, they produced significantly higher-quality revisions in comparison to when they received human-only feedback. The effect size is roughly equivalent to a student moving from the 50th to the 70th percentile.

The team also evaluated feedback quality using criteria derived from learning sciences research, including whether AI-generated comments promoted independent learning by guiding students with hints instead of simply providing answers. AI-mediated feedback outperformed human-only feedback across all measures and covered more rubric items.

TAs generally found the AI suggestions accurate but still made corrections. In the study, they agreed with about 88% of the AI’s judgments, making edits to the remaining 12%. In interviews, TAs said Feedback Writer helped them be more systematic in applying the rubric and, unexpectedly, helped them better understand the rubric themselves by highlighting relevant examples.

A Tool to Reallocate Time, Not People

The researchers emphasized that AI-mediated feedback is designed to support human instruction, not replace it. The team is now exploring whether AI support on routine tasks can enable TAs to spend more time on direct student support, such as office hours and one-on-one help, while still keeping humans responsible for final evaluations. 

“Our results show that when AI is designed to complement human expertise, and when people can verify and correct mistakes, it can help students learn more effectively,” said Wang.

The study, “AI-Mediated Feedback Improves Student Revisions: A Randomized Trial with FeedbackWriter in a Large Undergraduate Course,” was presented at the ACM CHI conference on Human Factors in Computing Systems on April 16. 

Explore the tense and treacherous trails of Mount Everest, or the calming and serene beauty of the Nile River. Visit the halls of the Detroit Institute of Art, or settle onto a comfy cushion at a meditation studio. 

Near or far, vast or small, any location is ripe for lessons, learning, and growth inside the Extended Reality (XR) studio at the University of Michigan Center for Academic Innovation, which currently offers five uniquely different virtual production formats geared toward enhancing traditional lectures and the professor-student relationship.

The center partnered with a number of U-M faculty seeking ways to enhance their learning outcomes and provide students with immersive and lifelike experiences they otherwise would not be able to access. For example, joining a Mount Everest climbing expedition to simulate life-or-death medical decisions in high-pressure and high-stakes environments. 

XR and Virtual Production Formats

FormatsUse CaseMinimum Timeline
2D Backplate ProductionFor presentations, lectures, and interviews using static backgrounds with no 3D interaction.3 Days—1 day for background sourcing, 1 day for studio setup, and 1 day for production.
2.5D Backplate ProductionAdds layered 2D images to allow slight camera movement and visual depth for presentations or simple scripted scenes.4 Days—2 days for background sourcing and preparation, 1 day for setup, and 1 day for production.
3D Backplate ProductionUses sourced or custom 3D environments to support dynamic single or multi-camera setups, providing basic spatial immersion for presentations and storytelling.6 Weeks—2 weeks for concept development, 2 weeks for environment creation or sourcing, 1 week for testing and setup, and 1 day for production. An additional 2 weeks may be allocated for post-production 3D rendering if required.
3D XR-Interactive ProductionFully immersive virtual sets with AR graphics, animations, overlays, set extensions, and interactive elements. Ideal for high-engagement teaching and dynamic presentations.9 Weeks—3 weeks for concept development, 3 weeks for environment creation or sourcing, 1 week for interactive animation and system integration, 1 week for testing and setup, and 1 day for production. An additional 3 weeks may be allocated for post-production 3D rendering if required.
Cinematic Virtual ProductionCombines real-time 3D environments or 2D backplates with camera tracking, physical props, and actors to deliver story-driven, cinematic instructional experiences.4 Months—Approximately 2 months for concept development, scripting, and planning; 1 month for environment creation, sourcing, animation, casting, and prop development; 2 weeks for testing and setup; and 1-3 days for production. An additional 4 weeks may be allocated for post-production 3D rendering if required.
Overview: XR Studio Production Formats and Timeline. Timelines are estimates and not fixed.

Barbara Medvec, a clinical associate professor at the School of Nursing, is one of the instructors embracing this visually stunning technology—which filmmakers in Hollywood utilize in big-budget productions such as “The Mandalorian” and the most recent “Avatar” pictures—for online learning.

“My perspective in creating the overall XR Experience was that it fundamentally changed how I think about online teaching,” Medvec said.

She, and her colleague Michelle Aebersold, a School of Nursing clinical professor and clinical associate professor in the School of Information, brought their in-person interactive simulation, “Navigating Team Dynamics in Extreme Environments,” to the virtual production team at CAI with visions of enveloping learners (in this case, nursing students) in a dangerous summit attempt of Mount Everest.

The Everest experience is an example of a Cinematic Virtual Production, the largest such undertaking offered by CAI and one which requires a production timeline upwards of four months. But, not every lesson demands an Everest-sized scope and scale. Cheri Alexander, a faculty member at the Ross School of Business, envisioned the studio as an opportunity to transport her classroom—and her students—an hour away to Detroit and around the globe to Egypt for lessons in her course series, “Extraordinary Human Capital Management.”

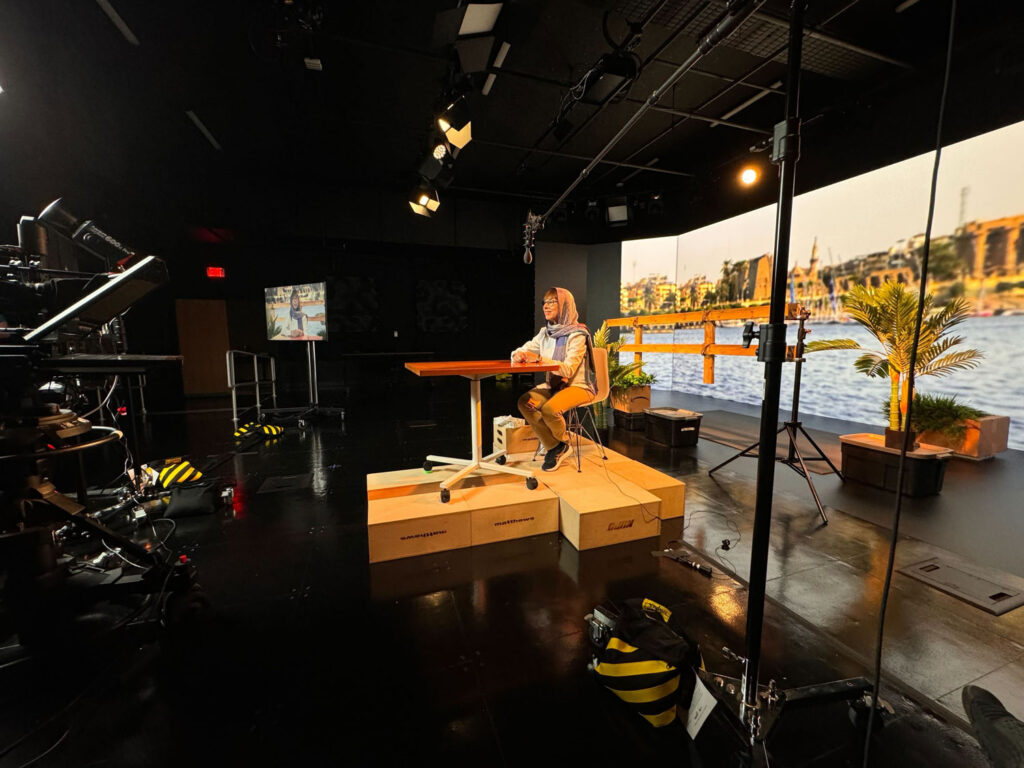
The result was a self-described “excellent experience” working with the center’s production team and spot-on recreations of the Detroit Institute of Art and Nile River in Egypt. 

“I believe this significantly enhanced the learning experience, as it helped simulate the places where the stories I was sharing originally unfolded. These visual settings create vivid mental images that deepen engagement and understanding as learners move through the course,” Alexander said.

Ross faculty member Cheri Alexander on the set of her course series, “Extraordinary Human Capital Management.”

From a production and time-commitment standpoint (typically three days, beginning to end), this form of virtual production, known as a 2D Backplate Production, utilizes everything from generative AI, video plates, stock videos, motion graphics and more to create new environments or, in the case of Alexander’s lesson, recreate a particular location with the intent of visually captivating the learner and aiding their engagement.

“Whether exploring the vacuum of deep space, prehistoric landscapes, or hazardous simulations, XR and VP application in education allows an instructor to be physically immersed in the subject matter. This eliminates the barriers of distance and danger, fostering deeper learner engagement and sparking a sense of curiosity that traditional classroom settings cannot match,” said Chiemela Mgbeahuru, virtual production producer at the center.

Slightly more time consuming, 3D Backplate Productions, like the ones utilized in the course series “Mindfulness, Dignity, and the Art of Human Connection,” take roughly six weeks to complete production. This format utilizes sourced or custom 3D environments to support dynamic single or multi-camera setups, adding a visceral layer to presentation and storytelling.

Kameron Donald, media designer senior at the center, not only filmed the instructional videos for the series, but found himself enlightened by the benefits of mindfulness and meditation on one’s mental health. The effectiveness of the deeply engaging experience was powerful. 

“Professor Ram (Mahalingam) taught people how to think through life situations, how to process your thoughts and have calmness,” Donald said. “It covers a lot of things that people face on a day-to-day basis.”

Additional Benefits of XR and Virtual Productions

The ability to produce “on-location” videos without actually being ON location avoids prolonged shoots due to inclement weather and distractions (i.e. interruptions from curious bystanders), which cause breaks in filming, exhaustion and stress for faculty and crew, and, potentially, additional financial burden to the overall production.

“When I consider the comparison of the power of in-person simulations which can be powerful because of physical presence and live interaction, I also understand that they are limited by cost, scheduling, and scalability. Only a small number of learners can participate, and the experience varies widely from session to session,” Medvec said, adding, “XR allowed us to move beyond content delivery into experience design. Instead of asking learners to imagine leadership under pressure, we placed them inside it—cognitively, emotionally, and ethically.”

Mgbeahuru sees the educational impact of virtual instructional videos in a similar fashion to traditional storytelling and news delivery.

“Consider why meteorologists and reporters stand directly in the path of a hurricane. By filming intense weather in real-time, they provide a visceral sense of being there, helping viewers grasp the gravity of the situation through the correspondent’s perspective,” he said. “Virtual production and XR technologies bring this same on-location power to education.”

Raising the Bar of Online Instruction

Ringing endorsements aside, these production styles are an added lift for faculty, which begs the question: Why should they go to these lengths (arguably massive lengths) to teach a lesson previously contained to a classroom or lecture studio? 

“The ability to create an immersive experience that blends storytelling, crisis under pressure, and team dynamics allows the learner to get a profound experience that goes beyond what we can do in a simulation lab,” said Aebersold. “Bringing nursing faculty together with media experts and software designers was an amazing experience and allowed us to push the boundaries of what is possible,” she added.

Medvec perhaps best sums up the impact of XR and virtual production on instructional videos.

“XR raised the bar for me as a faculty [member] and it forced us to ask: What do we actually want learners to feel, notice, and decide at this moment? That question improved the entire course offerings and not just the immersive component.”

How this will help

Quality audio recordings improve learner comprehension
Equipment doesn’t need to be expensive to attain high-fidelity sound
Smart studio setup, proper use greatly improves recording quality

In online courses, audio quality plays a major role in how students engage with and understand course material. When audio is muffled, distorted, or inconsistent, learners must spend extra effort to hear the content rather than focusing on the ideas being presented. Clear, high-fidelity audio improves comprehension, reduces listener fatigue, and makes course recordings more accessible for a wider range of learners.

A quick search for audio recording equipment can send you down countless paths, from budget-friendly starter setups to incredibly expensive professional equipment. The internet is overflowing with gear recommendations, reviews, and conflicting advice, which can make getting started feel overwhelming.

The good news is that achieving professional-sounding audio doesn’t require a production studio or a room full of high-end equipment. If you have some experience recording audio for your courses, you can level up the quality of your audio by choosing the right essentials, properly setting up your recording space, and making a few technical adjustments.

What Makes Sound High-Fidelity?

Before exploring equipment and setup techniques, it helps to understand what high-fidelity audio actually means and what you’re trying to achieve in a recording.

High-fidelity sound simply means audio that is reproduced as accurately and cleanly as possible. A high-fidelity recording captures the full range of frequencies, from deep low-end bass to crisp high-end detail, without unwanted noise or distortion. It preserves the dynamics of a recording so the playback feels natural and true to the original source.

In an educational context, high-fidelity sound ensures that students can clearly hear explanations, terminology, and subtle changes in tone that convey emphasis or meaning. Better audio quality can improve student engagement, support accessibility for learners using assistive technologies, and reduce the frustration that often comes with poorly recorded lectures.

Fortunately, achieving this level of clarity doesn’t require complex studio setups. A few key decisions about equipment, environment, and recording technique can dramatically improve the quality of your audio.

Choosing the Right Microphone

One of the most important decisions in any recording setup is choosing the right microphone. Different types of microphones vary in cost, ease of use, and sound quality. The following options represent common choices for faculty instructional content. You don’t need the most expensive option, but a reliable microphone from a reputable brand will make a huge difference.

MICROPHONEPROSCONS
Internal Smartphone Microphone– Use personal device
– On board voice memos app
– Audio recorded during video often sounds different because the phone is positioned farther away
– Smartphone needs to be close to your mouth
– A quiet environment is required
USB Microphone– Easy to use
– Plugs into computer
– Doesn’t require separate hardware
– Smaller, lower-quality internal preamplifiers
– Higher noise level
– Higher likelihood of audio distortion
– Limited control
Lavalier (lapel) Microphone– Small, clip-on microphones which are commonly used for video lectures, interviews, and presentations
– Come in several forms, and some plug directly into smartphones, computers, or portable recorders, while others use Bluetooth or can connect via XLR to an audio interface
– Because they sit close to the mouth, they capture consistent audio even if you move around
– Fragile and less durable than other options
– Requires a collared shirt and precise placement just above your sternum
– Limitations based on the form factor you choose
Professional Dynamic XLR Microphone with an Audio Interface– The most flexible and highest-quality option
– This setup provides clearer audio and more precise control over your recording levels
– Delivers the best overall fidelity
– Require an external audio interface, which converts the analog signal into digital audio for your computer
– Requires a larger upfront investment
Compare different types of microphones looking at benefits and drawbacks of each.

The Right Environment

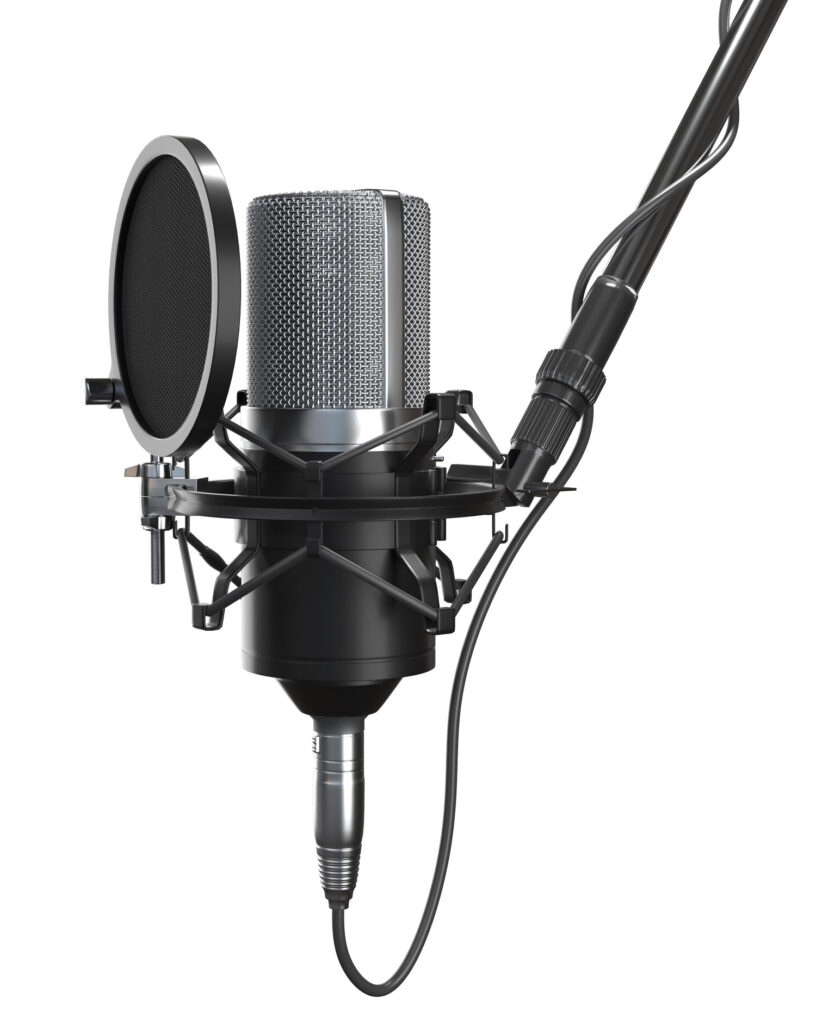
A pop filter  
  • Control Your Recording Space: The room matters more than most people think. Record in a quiet space away from traffic, appliances, and HVAC noise. Soft furnishings like rugs, couches, and even blankets can reduce reflections and echo. If possible, add acoustic panels or DIY wall treatments at reflection points to tighten your sound.
  • Position the Microphone Correctly: Mic placement dramatically affects tone. For vocals, start 6 to 12 inches away and adjust slightly off-axis to reduce harshness and plosives (pops). Small adjustments can make a big difference.
  • Use a Pop Filter or Windscreen: This minimizes plosive sounds (“P” and “B” bursts) and keeps your recording clean without needing heavy editing later. 
  • Monitor with Headphones: Over-ear headphones help you catch background noise, distortion, or mouth sounds before they become a problem.
  • Focus on Performance and Technique: Clear diction, consistent mic distance, and controlled dynamics often matter.

Let’s Get Technical

Once your physical recording setup is in place, a few basic technical settings can further improve your recording quality and prevent common audio issues. While these steps are not necessary for every setup, they are helpful if you have access to recording software or want more control over your audio quality. You can source this information through free and paid apps, some of which may come with your computer or smartphone, or are packaged with the microphone you selected.

  • Set Proper Gain Levels (Gain Staging): Avoid recording too hot. Aim for peaks around -12 dB to -6 dB to prevent clipping while preserving dynamic range.
  • Record at Appropriate Settings: Use at least 24-bit depth and 44.1 kHz or 48 kHz sample rate for clean, professional-quality recordings.
  • Edit Gently: Use EQ, compression, and noise reduction sparingly. High-fidelity audio should sound natural, not over-processed.

High-fidelity audio doesn’t require a professional recording studio, just a thoughtful approach to equipment, environment, your audience, and technique. By choosing an appropriate microphone, controlling your recording environment, and using a few simple technical best practices, faculty can produce clear, high-fidelity audio that enhances the online learning experience. Even small improvements in sound quality can make a meaningful difference in student engagement and comprehension. 

And that’s it. With a few thoughtful choices and simple best practices, anyone can produce clear, high-fidelity recordings, and it will make a meaningful difference in the learning experience you produce.

Resources

Finally, if you’d like to explore these ideas further, the following resources can help you continue to improve the learning experiences you’re creating.

Writing Scripts for Media

Level Up Your Multimedia Presentations with Simple Design Concepts

8 Ways to Make Your Online Learning Course More Authentic

How this will help

Simple graphic design skills to maximize presentations
Choose the right photos, fonts for your slides
Use templates to better engage audience while saving time

Preparing a presentation, whether it’s for your course or an upcoming conference, can be daunting for instructors not fluent in graphic design concepts. However, you don’t have to be a multimedia expert to create an impactful presentation.

Small considerations can go a long way in improving the look and effect of your work. By understanding your end goal, keeping your content succinct and clear, choosing strong images, and taking advantage of existing resources like templates, you can ensure your knowledge and insight connect with your audience. 

My video covers some tips and tricks for creating multimedia content that delivers maximum impact. With a little extra effort, you can build engaging presentations that best capture your message.

Practical Tips

  • Set slide dimensions: Determine what your final product will be (video, slide presentation, PDF, etc.), and research the ideal settings for that product. For example, if you’re creating video, look up the recommended specifications for recording, such as resolution and format.
  • Think small: Check your design for legibility at the smallest size your audience will view it, such as on a mobile phone.
  • Consider hierarchy: Lead each slide with a key message, keeping the words active and clear and avoiding lengthy sentences.
  • Use professional images: Choose sharp, interesting images with minimum resolution (72 dpi/ppi for screen, 150 dpi/ppi for print), making sure they’re at least the same size as the horizontal or vertical dimensions of your slides.
  • Make it accessible: Ensure everyone in your audience can engage with your slides with correct color and contrast choices and other structural considerations.
  • Choose the right fonts: Use two fonts – a sans serif and a serif font – and use the correct text size, with headings twice as large as body text.

Resources

Digital Accessibility at University of Michigan

Michigan Commons

Michigan Photography

U-M Brand Office

Center for Academic Innovation Media Design

How this will help

Craft effective assessments with smart prompt design
Use multiple choice writing guidelines to insure quality results
GenAI tools can save time, improve learning experiences

In higher education, developing strong multiple-choice questions can be a time-intensive part of the course design process. Developing such items requires subject-matter expertise and assessment literacy, and for faculty and designers who are creating and producing online courses, it can be difficult to find the capacity to craft quality multiple-choice questions.

At the University of Michigan Center for Academic Innovation, learning experience designers are using generative artificial intelligence to streamline the multiple-choice question development process and help ameliorate this issue. In this article, I summarize one of our projects that explored effective prompting strategies to develop multiple-choice questions with ChatGPT for our open course portfolio. We examined how structured prompting can improve the quality of AI-generated assessments, producing relevant comprehension and recall items and options that include plausible distractors.

Achieving this goal enables us to develop several ungraded practice opportunities, preparing learners for their graded assessments while also freeing up more time for course instructors and designers.

Prompt Design Matters

While it is possible to simply prompt a GenAI model to “write quiz questions,” our inquiry showed that the quality of GenAI-generated multiple-choice questions is tied to prompt structure. Our center team used five prompt versions, each with lecture transcripts from the open online course “Applied Machine Learning in Python.” After comparing the resulting items, we found that prompts that combined learning objectives and explicit item-writing guidelines produced the most relevant questions and the most plausible distractors.

The Anatomy of an Effective Prompt

Our most successful prompt included four key layers of instruction:

  1. Module learning objectives: High-quality multiple-choice questions facilitate formative and summative assessment when they are aligned with learning objectives. This component helps anchor each question in the intended outcomes.
  2. Multiple choice question writing guidelines: Specifying construction rules for stems and options, such as avoiding trick questions and including feedback for each option, yields items that are relevant, well-written, and non-ambiguous (Haladyna & Rodriguez, 2013).
  3. Context: We provided textual transcripts of course videos and asked the model to strictly use the provided content. We also asked for feedback on the options so that learners can learn from their mistakes.
  4. Formatting instructions: We can upload formatted multiple-choice question files that the learning management system, in this case Coursera, uses to automatically add the question to course quizzes. We included the LMS formatting in our prompt.

Prompt Template

We have distilled our findings into a reusable template that instructors and instructional designers can adapt for their own use in generative AI models:

Writing multiple choice questions from lecture text

  1. Develop {number of items} recall and comprehension multiple choice questions from the following lecture script: {insert text}.
  2. Use these learning objectives: {insert objectives}.
  3. Follow these multiple-choice question development guidelines:
    1. Single correct answer items: Each question should have one clear stem, one correct answer, and three plausible distractors. Avoid trick or opinion-based questions, and exclude phrases like “in the video” or “according to the instructor.”
    2. Multiple correct answer items: Each question should have one clear stem, two correct answers, and two plausible distractors. Avoid trick or opinion-based questions, and exclude phrases like “in the video” or “according to the instructor.”
  4. Provide item-specific feedback for each option using lesson material.
  5. Output in this format: {structured example}.

Example using the Prompt Template

To illustrate this process, let’s apply the prompt template to the module, “What Are Transformers?” from the previously identified course. The beginning of the prompt starts with stating the task to develop multiple-choice questions.

Task

Develop 12 multiple-choice questions for each of the lectures in the “What are Transformers” lesson of the open online course “Applied Information Extraction in Python.” Below are module learning objectives, item writing criteria, desired formatting of the items developed, type items developed, transcripts of videos in this module separated by their title.

Learning objectives

  • Explain what language models and large language models are.
  • Describe transformer-based models and their applications.
  • Articulate advances in deep neural network models for information extraction.
  • Configure a deep neural network model to detect entities of interest.

Item types

Write two types of multiple-choice questions:

  • Single correct answer, where only one option is correct.
  • Multiple correct answers, where more than one option is correct.

Of the 12 questions, nine should be the single correct answer type.

Item writing guidelines

  • Separate items for each lecture with the lecture title.
  • Each question addresses one type of content.
  • Questions are independent of each other.
  • Avoid trick questions.
  • Avoid opinion-based questions.
  • Avoid “all of the above” and “none of the above.”
  • Avoid True/False items.
  • Use only options that are plausible and discriminating. Three options are usually sufficient.
  • For single-correct-answer multiple-choice questions, only one option is the correct answer.
  • Options should be independent of each other.
  • Options should be worded positively.
  • Do not include clues to the right option.
  • Avoid “always” and “never.”
  • Avoid obviously incorrect options. Distractors should be plausible.
  • Write feedback for each option. Feedback should not reveal the correct answer.

Item formatting

Use the following format to write the single-correct-answer multiple-choice questions:

Question number – multiple choice shuffle

Question stem goes here

A: Incorrect option 1 goes here

Feedback: Add feedback about why this option is incorrect

*B: Correct answer goes here (add “*” to correct option)

Feedback: Add feedback about why this option is correct

C: Incorrect option 2 goes here

Feedback: Add feedback about why this option is incorrect

D: Incorrect option 3 goes here

Feedback: Add feedback about why this option is incorrect

Use the following format for multiple-correct-answer multiple-choice questions:

Question number – checkbox, shuffle, partial credit

Question stem goes here

A: Incorrect option 1 goes here

Feedback: Add feedback about why this option is incorrect

*B: Correct answer goes here (add “*” to correct option)

Feedback: Add feedback about why this option is correct

C: Incorrect option 2 goes here

Feedback: Add feedback about why this option is incorrect

*D: Correct option 2 goes here  (add “*” to correct option)

Feedback: Add feedback about why this option is correct

Upload transcripts

Lecture Video 1 Transcript Title (upload transcript here)

Lecture Video 2 Transcript Title (upload transcript here)

Lecture Video 3 Transcript Title (upload transcript here)

Lecture Video 4 Transcript Title (upload transcript here)

Results

With this prompt, the model generates questions similar to the following, which are organized for easy uploading to the learning platform:

Q1 – single choice
What is the main function of the encoder in a transformer model?

A. Generate the next token in a sequence.
Feedback: Incorrect – this describes the decoder stage.

*B. Create a representation of the input text.
Feedback: Correct – the encoder builds contextual embeddings used for downstream tasks like classification or NER.

C. Store labeled datasets for training.
Feedback: Incorrect – transformers train on unlabeled corpora.

D. Identify which tokens should receive more attention.
Feedback: Incorrect – the attention layer handles weighting across tokens.

Lessons Learned

Testing the use of GenAI to craft multiple-choice questions provided encouraging results and showed that with thoughtful planning and strident review, instructors and course designers can prepare quality assignments and assessments for their learners while also freeing up valuable course planning and design time. 

Anyone looking to use AI tools for building multiple-choice questions should be sure to:  

  1. Include learning objectives. They significantly improve question relevance.
  2. Embed item-writing guidelines. This increases distractor plausibility and grammatical consistency.
  3. Avoid overly general instructions. Prompts that lack context produce meta-questions about “the course” rather than “the concept.”
  4. Iterate and use human review. Even with strong prompts, expert validation remains essential.

Responsible Scaling

As learning experience designers, we collaborate with faculty members and instructors to design and develop courses. We always ask our faculty partners to review the resulting questions before uploading them to the platform. Our faculty partners remove weak questions, adjust inaccurate options, and sometimes refine the feedback.

In our research project, our data scientist built a technical infrastructure that extracted video transcripts automatically and then linked them to the prompts for additional context. This workflow combines AI efficiency with human oversight infrastructure, allowing us to process hundreds of video transcripts efficiently. For more information on U-M resources for transcribing your videos, review this article or reach out to the Information and Technology Services team

When utilizing GenAI to help create course activities or assessments, it is important to select the right source materials for the tool. Your course materials will provide key context to the tools as they work toward an output.

Looking Ahead

Our team at the center continues to expand its work on developing different assessment types with GenAI tools. Some of our current inquiries include difficulty calibration and question-bank automation across different learning management systems.

So far, we have learned that by embedding rigorous prompt design into course development workflows, we can focus less on manual item drafting and more on higher-level learning design.

Using GenAI tools as a time-saving resource while reinforcing accuracy through expert review and iteration by faculty and course designers has revealed exciting potential for future online course development.

The Center for Academic Innovation team included author Hedieh Najafi (learning experience designer senior), Sean Vucinich (solution developer lead), Weiyi Zhang (learning experience designer senior), Lyndsay Wing (learning experience designer senior), and former learning experience designer Melissa McCurry.

Practical Tips

  • Include learning objectives. They significantly improve question relevance. If you need help writing learning objectives, review this article.
  • Embed item-writing guidelines. This increases distractor plausibility and grammatical consistency.
  • Avoid overly general instructions. Prompts that lack context produce meta-questions about “the course” rather than “the concept.”
  • Iterate and use human review. Even with strong prompts, expert validation remains essential.

References

Vucinich, S., Najafi, H., McCurry, M., Zhang, W., Dizon, L., & Wing, L. (2025) Effective Prompting to Generate Multiple Choice Questions with GPT-4o. University of Michigan Center for Academic Innovation.
Haladyna, T.M., & Rodriguez, M.C. (2013). Developing and Validating Test Items. Routledge.
Arif, T., Asthana, S., & Collins-Thompson, K. (2024). Generation and Assessment of Multiple-Choice Questions from Video Transcripts using Large Language Models. ACM Learning @ Scale.